<?xml version="1.0" encoding="utf-8"?><feed xmlns="http://www.w3.org/2005/Atom" xml:lang="en"><generator uri="https://jekyllrb.com/" version="4.4.1">Jekyll</generator><link href="https://ferbass.xyz/feed.xml" rel="self" type="application/atom+xml" /><link href="https://ferbass.xyz/" rel="alternate" type="text/html" hreflang="en" /><updated>2026-03-31T09:52:15+09:00</updated><id>https://ferbass.xyz/feed.xml</id><title type="html">ferbass.xyz</title><subtitle>Notes on software engineering, macOS, Ruby, AI, and technical experiments by Fernando Bass.</subtitle><author><name>Fernando Bass</name></author><entry><title type="html">Privacidade: O preço da civilização?</title><link href="https://ferbass.xyz/2026/03/18/privacidade-o-pre%C3%A7o-da-civiliza%C3%A7%C3%A3o.html" rel="alternate" type="text/html" title="Privacidade: O preço da civilização?" /><published>2026-03-18T10:54:00+09:00</published><updated>2026-03-18T10:54:00+09:00</updated><id>https://ferbass.xyz/2026/03/18/privacidade-o-pre%C3%A7o-da-civiliza%C3%A7%C3%A3o</id><content type="html" xml:base="https://ferbass.xyz/2026/03/18/privacidade-o-pre%C3%A7o-da-civiliza%C3%A7%C3%A3o.html"><![CDATA[<p>Estou relendo o livro <strong>“Limites da Fundação”</strong>, de Isaac Asimov, e me deparei com alguns trechos interessantes que eu não lembrava desde a primeira vez que li, há 20 anos. Gostaria de compartilhar essa reflexão aqui.</p>

<p>O diálogo ocorre entre <strong>Golan Trevize</strong> e <strong>Janov Pelorat</strong> nos primeiros momentos de sua jornada interestelar. Trevize se preocupa com a possibilidade de a nave estar equipada com um hipertransmissor, o que comprometeria a privacidade deles.</p>

<p>Primeiro, Pelorat pergunta:</p>

<blockquote>
  <p>[…]</p>

  <p>— Ah, entendo. Quero dizer, não entendo. O que é um hipertransmissor?</p>
</blockquote>

<p>Trevize responde de forma direta:</p>

<blockquote>
  <p>[…]</p>

  <p>— Bom, deixe-me explicar, Janov. Estou em comunicação com Terminus. Ou melhor, posso me comunicar quando quiser, e Terminus pode, reversamente, se comunicar conosco. Eles sabem a localização da nave, pois observaram sua trajetória. Mesmo se não tivessem observado, poderiam nos localizar ao escanear o espaço próximo à procura de massas, o que os alertaria sobre a presença de uma nave ou, talvez, de um meteoroide.</p>
</blockquote>

<p>O diálogo avança mais um pouco:</p>

<blockquote>
  <p>[…]</p>

  <p>— Me parece, Golan — afirmou Pelorat —, que o <strong>avanço da civilização não é nada além de um exercício na limitação da privacidade.</strong></p>
</blockquote>

<p>O diálogo avança mais um pouco e em seguida, uma conclusão inusitada:</p>

<blockquote>
  <p>[…]</p>

  <p>Não haveria nenhum lugar na Galáxia onde poderíamos nos esconder e nenhuma combinação de Saltos pelo hiperespaço possibilitaria nossa evasão dos instrumentos à disposição deles.</p>

  <p>— Mas, Golan — disse Pelorat suavemente —, nós queremos a proteção da Fundação, não?</p>

  <p>— Sim, Janov, mas apenas quando a requisitarmos. Você disse que o avanço da civilização significava a contínua restrição de nossa privacidade. Bom, não quero algo tão avançado assim. <strong>Quero ter a liberdade de me locomover como bem entender, sem ser detectado, a não ser que eu deseje proteção ou precise dela.</strong> Portanto, eu me sentiria melhor, muito melhor, se não houvesse um hipertransmissor a bordo.</p>
</blockquote>]]></content><author><name>Fernando Bass</name></author><summary type="html"><![CDATA[Estou relendo o livro "Limites da Fundação" , de Isaac Asimov, e me deparei com alguns trechos interessantes que eu não lembrava desde a primeira vez que li,...]]></summary><media:thumbnail xmlns:media="http://search.yahoo.com/mrss/" url="https://ferbass.xyz/img/avatar.png" /><media:content medium="image" url="https://ferbass.xyz/img/avatar.png" xmlns:media="http://search.yahoo.com/mrss/" /></entry><entry><title type="html">Open Source AI</title><link href="https://ferbass.xyz/2025/07/13/opensource-ai.html" rel="alternate" type="text/html" title="Open Source AI" /><published>2025-07-13T19:55:00+09:00</published><updated>2025-07-13T19:55:00+09:00</updated><id>https://ferbass.xyz/2025/07/13/opensource-ai</id><content type="html" xml:base="https://ferbass.xyz/2025/07/13/opensource-ai.html"><![CDATA[<p>I’m pretty sure you already heard or even use Open Source AI models.
In fact, as of today, there are more than 1 Million Models hosted on <a href="http://huggingface.co">HuggingFace</a>.
But before talk about OpenSource AI, I want to talk about Open Source Software.</p>

<p>Open Source Software has been around for over three decades, and by now, we’re all familiar with what it means in terms of licensing,
access, and freedom. Open Source Software is defined by a few key principles: transparency, collaboration,
community-driven development, and shared ownership.
These characteristics ensure that users can inspect,
modify, and distribute the code freely, fostering innovation, reducing costs, and promoting trust in software.</p>

<p>It is important to remember that there are Organizations behind Open Source, these organizations ensure that Open Source Software remains ethical,
secure, and sustainable, while helping users navigate the complexities of licensing, attribution, and contribution guidelines.</p>

<p>So, how about AI? Like I mention before, if you access HuggingFace you will see,
Million of models, but are those models Open Source? What does define an AI model to be Open Source?</p>

<p>An Open Source AI model is defined by principles similar to those of Open Source Software,
but with additional considerations specific to AI, such as:</p>

<ul>
  <li>Training methodology: This includes the algorithms, hyperparameters,
frameworks, and optimization techniques used during training.</li>
  <li>Training data provenance: This covers the sources, licenses, curation processes,
and ethical considerations (bias, fairness, and data privacy) of the training data.</li>
  <li>Documentation: Comprehensive documentation should accompany the model, including access to source code,
pre-trained weights, and step-by-step instructions for reproducibility.</li>
  <li>Ethical and legal compliance: The model must adhere to Open Source licenses like MIT, Apache,
and address ethical concerns such as bias audits, data privacy, and transparency in model behavior.</li>
  <li>Community and governance: Clear governance structures, maintainer roles,
and collaboration processes (contribution guidelines, version control)
should be established to ensure ongoing development and accountability.</li>
</ul>

<p>In Open Source AI, the source code must be freely accessible and distributed under permissive Open Source Licenses such as MIT,
Apache, or similar. Also, these models require full disclosure of the training methodology,
the origins and composition of the training data, and ethical considerations.</p>

<p>Sounds great right? Well, despite these definitions and requirements, the reality of Open Source AI today is different.
Many models do share access to pre-trained weights, while full source code is often not available.
Training data is rarely disclosed, even when models are Open Source. This could be due to a combination of licensing constraints, legal risks (data privacy laws like GDPR),
and ethical concerns like protecting sensitive or personal information in the data. Also those models requires Petabytes of data,
as you can imagine, sharing such massive datasets is not practical.
On more thing to consider is that to training these models isn’t simple.
We are talking about tons of GPUs, which are super expensive, hard to come by, and take forever to run.
For big companies, this is less of a problem, they have the budget and the infrastructure. But for smaller teams, universities,
or Open Source collaborations, this could be challengy.</p>

<p>So, while the idea of Open Source AI sounds great, the reality is that people are stuck balancing transparency with the messy,
real world stuff: legal risks, data ethics, and size of the datasets.
It’s tricky, but it’s also a chance to rethink how we do AI responsibly without sacrificing progress.</p>

<p>Open Source AI isn’t dead, and it’s definitely not bad.
In fact, it’s out there, and it’s doing some seriously cool stuff.
You can download models, run them on your local machine or a dedicated server,
fine-tune them, or even use them with your own private data (like with RAG).
It’s all about customization, and that’s where the magic happens.</p>

<p>Projects like OpenWebAI, Hugging Face, Ollama, and others are making this possible.
They’re acting like the ‘bridge’ between the big, fancy AI models (that require mountains of GPUs and cash) and the rest of us.
These tools let you pick and choose models that actually fit your needs whether you’re a student, a small team, or a nonprofit.</p>

<p>Check my previous post about <a href="https://ferbass.xyz/2025/06/12/running-your-local-llm-on-macos-using-docker-and-ollama.html">Running your local LLM on MacOS using Docker and Ollama</a>.</p>

<p>If you want to know more about Open Source and Open Source AI:</p>

<ul>
  <li><a href="https://lfaidata.foundation">Linux Foundation – AI &amp; Data Foundation</a></li>
  <li><a href="https://www.osaif.org">Open Source AI Foundation (OSAIF)</a></li>
  <li><a href="https://huggingface.co">Hugging Face</a></li>
  <li><a href="https://opensource.org">Open Source Initiative (OSI)</a></li>
</ul>

<p>Thats all for this post, I’m planning to keep exploring posts related to AI, so stay tunned.</p>]]></content><author><name>Fernando Bass</name></author><category term="LLM" /><category term="AI" /><category term="Open Source" /><category term="Ollama" /><category term="HuggingFace" /><summary type="html"><![CDATA[I'm pretty sure you already heard or even use Open Source AI models. In fact, as of today, there are more than 1 Million Models hosted on HuggingFace. But...]]></summary><media:thumbnail xmlns:media="http://search.yahoo.com/mrss/" url="https://ferbass.xyz/img/avatar.png" /><media:content medium="image" url="https://ferbass.xyz/img/avatar.png" xmlns:media="http://search.yahoo.com/mrss/" /></entry><entry><title type="html">Running your local LLM on MacOS using Docker and Ollama</title><link href="https://ferbass.xyz/2025/06/13/running-your-local-llm-on-macos-using-docker-and-ollama.html" rel="alternate" type="text/html" title="Running your local LLM on MacOS using Docker and Ollama" /><published>2025-06-13T00:09:00+09:00</published><updated>2025-06-13T00:09:00+09:00</updated><id>https://ferbass.xyz/2025/06/13/running-your-local-llm-on-macos-using-docker-and-ollama</id><content type="html" xml:base="https://ferbass.xyz/2025/06/13/running-your-local-llm-on-macos-using-docker-and-ollama.html"><![CDATA[<p>In this post, we will explore how to run a local Large Language Model (LLM) on MacOS using Docker and Ollama. This setup allows you to leverage the power of LLMs without needing extensive hardware resources.</p>

<p>First, why run an LLM locally?</p>

<ul>
  <li><strong>Privacy</strong>: Your data remains on your machine, reducing the risk of data leaks.</li>
  <li><strong>Cost</strong>: Avoiding cloud costs associated with API calls.</li>
  <li><strong>Speed</strong>: Local inference can be faster than making API call (small-scale).</li>
</ul>

<h2 id="prerequisites">Prerequisites</h2>

<p>Everything I’m showing here was tested on MacOS 15.x with a M4 Pro cpu, but it should work on other versions as well.</p>

<ul>
  <li>
    <p><strong>Brew</strong> : Ensure you have Homebrew installed. If not, you can install it by running the following command in your terminal:</p>

    <div class="language-bash highlighter-rouge"><div class="highlight"><pre class="highlight"><code>/bin/bash <span class="nt">-c</span> <span class="s2">"</span><span class="si">$(</span>curl <span class="nt">-fsSL</span> https://raw.githubusercontent.com/Homebrew/install/HEAD/install.sh<span class="si">)</span><span class="s2">"</span>
</code></pre></div>    </div>
    <ul>
      <li>access <a href="https://brew.sh">https://brew.sh</a> for more information.</li>
    </ul>
  </li>
  <li>
    <p><strong>Docker</strong>: Ensure you have Docker installed and running on your Mac. You can download it from <a href="https://www.docker.com/products/docker-desktop/">Docker’s official site</a>.</p>
    <ul>
      <li><strong>Docker-compose</strong></li>
    </ul>
  </li>
</ul>

<h2 id="get-started">Get started</h2>

<p>First of all, by the time I’m writing this, Docker for MacOS does not support GPU acceleration, and because I want to leverage on the GPU capabilities of my M4 chip, I’ll be running Ollama server outside of the Docker container and use Docker only for OpenWebUI, which is a web-based interface for interacting with LLMs.</p>

<h3 id="install-ollama">Install Ollama</h3>

<p>What is Ollama?
You can think about Ollama as a package manager for LLms, which allows you to run and manage LLMs locally. It provides a simple command-line interface to download, run, and interact with various LLMs.</p>
<ul>
  <li>Check <a href="https://ollama.com">Ollama’s website</a> for more information.</li>
</ul>

<p>To install Ollama, you can use Homebrew. Open your terminal and run the following command:</p>

<div class="language-bash highlighter-rouge"><div class="highlight"><pre class="highlight"><code>brew <span class="nb">install </span>ollama
</code></pre></div></div>

<p>Once installed, you can verify the installation by running:</p>

<div class="language-bash highlighter-rouge"><div class="highlight"><pre class="highlight"><code>ollama <span class="nt">--version</span>
</code></pre></div></div>

<p>This should display the version of Ollama you have installed.</p>

<p>To verify if Ollama is running you can check the status of the service:</p>

<div class="language-bash highlighter-rouge"><div class="highlight"><pre class="highlight"><code>brew services info ollama
</code></pre></div></div>

<p>You should see that the service is running like the output below:</p>

<div class="language-plaintext highlighter-rouge"><div class="highlight"><pre class="highlight"><code>ollama (homebrew.mxcl.ollama)
Running: ✔
Loaded: ✔
Schedulable: ✘
User: ferbass
PID: 75692
</code></pre></div></div>

<p>if the service is not running you can start it with:</p>

<div class="language-bash highlighter-rouge"><div class="highlight"><pre class="highlight"><code>brew services start ollama
</code></pre></div></div>

<p>Ok, now that you have Ollama installed and running we can download our first model to test.
For this example I’ll be using <a href="https://ollama.com/library/qwen3">qwen3:4b</a> which is a 4 billion parameter model that should run smoothly on M4 chips.</p>

<p>To download the model, run the following command:</p>

<div class="language-bash highlighter-rouge"><div class="highlight"><pre class="highlight"><code>ollama run qwen3:4b
</code></pre></div></div>

<p>This command will pull and run the Qwen3 model right after downloading it.
Alternatively, you can use the <code class="language-plaintext highlighter-rouge">ollama pull</code> command to download the model without running it immediately.</p>

<p>After download the model and run it, you should see an input interface on your terminal to interact with the model.
Go ahead and try a few prompts to see how it responds. For example, you can ask it:</p>

<div class="language-plaintext highlighter-rouge"><div class="highlight"><pre class="highlight"><code>❯ ollama run qwen3:4b
&gt;&gt;&gt; What is the capital of France?
Thinking...
Okay, the user is asking for the capital of France. Let me start by recalling what I know. France is a country in Europe, and I remember that its capital is Paris. But wait, I should
make sure I'm not confusing it with another city. Let me think... Paris is definitely the capital. I think it's also the largest city in France. But maybe I should double-check.
Sometimes people might confuse other major cities like Lyon or Marseille, but those are not the capitals. The capital is Paris, right? Yes, that's correct. So the answer is Paris. I
should present that clearly.
...done thinking.

The capital of France is **Paris**.

&gt;&gt;&gt;
</code></pre></div></div>

<p>Cool, now that we have Ollama running and a model downloaded, we can move on to the next step: setting up OpenWebUI.</p>

<h3 id="install-openwebui">Install OpenWebUI</h3>

<p>OpenWebUI is a self-hosted, open-source chat interface for LLMs. It gives you a web-based experience similar to ChatGPT — but fully local, private, and customizable. It’s designed to work out-of-the-box with backends like Ollama, LM Studio, or OpenAI-compatible APIs, making it perfect for macOS setups running LLMs natively.
I’ll not go into details about OpenWebUI in this post, but you can check their <a href="https://github.com/open-webui/open-webui">GitHub repository</a> for more information.</p>

<p>To run OpenWebUI, we will use Docker. First, ensure you have Docker installed and running on your Mac.</p>

<div class="language-yaml highlighter-rouge"><div class="highlight"><pre class="highlight"><code><span class="na">services</span><span class="pi">:</span>
  <span class="na">open-webui</span><span class="pi">:</span>
    <span class="na">image</span><span class="pi">:</span> <span class="s">ghcr.io/open-webui/open-webui:main</span>
    <span class="na">container_name</span><span class="pi">:</span> <span class="s">open-webui</span>
    <span class="na">ports</span><span class="pi">:</span>
      <span class="pi">-</span> <span class="s2">"</span><span class="s">3000:8080"</span>
    <span class="na">environment</span><span class="pi">:</span>
      <span class="pi">-</span> <span class="s">OLLAMA_BASE_URL=http://host.docker.internal:11434</span>
    <span class="na">volumes</span><span class="pi">:</span>
      <span class="pi">-</span> <span class="s">${HOME}/open-webui-data:/app/backend/data</span>
    <span class="na">restart</span><span class="pi">:</span> <span class="s">unless-stopped</span>

<span class="na">volumes</span><span class="pi">:</span>
  <span class="na">open-webui-data</span><span class="pi">:</span>
</code></pre></div></div>

<div class="language-bash highlighter-rouge"><div class="highlight"><pre class="highlight"><code>docker-compose up <span class="nt">-d</span>
</code></pre></div></div>

<p>This command will start the OpenWebUI service in detached mode.</p>

<p>If everything goes well, you should see be able to access http://localhost:3000 and interact with OpenWebAI via your web browser using the model you downloaded earlier.</p>

<h3 id="what-is-next">what is next</h3>

<p>Now that you have a local LLM running using Ollama and OpenWebUI,
I encorage you to explore more models and settings and try to see which one works best for you.
You can find more models on the <a href="https://ollama.com/search">Ollama</a>.</p>

<p>So far on my tests using a MacBook M4 Pro with 48GB of RAM, I was able to run models size up to 8B parameters without any issue.</p>

<p>I encorage you explore different models, settings, and try to play around with Knowledge Base, Tools and Function which I will explore in future posts.</p>

<p>Thanks</p>]]></content><author><name>Fernando Bass</name></author><category term="docker" /><category term="ai" /><category term="ollama" /><category term="llm" /><summary type="html"><![CDATA[In this post, we will explore how to run a local Large Language Model (LLM) on MacOS using Docker and Ollama. This setup allows you to leverage the power of...]]></summary><media:thumbnail xmlns:media="http://search.yahoo.com/mrss/" url="https://ferbass.xyz/img/avatar.png" /><media:content medium="image" url="https://ferbass.xyz/img/avatar.png" xmlns:media="http://search.yahoo.com/mrss/" /></entry><entry><title type="html">Inspiration</title><link href="https://ferbass.xyz/2025/04/17/inspiration.html" rel="alternate" type="text/html" title="Inspiration" /><published>2025-04-17T14:01:00+09:00</published><updated>2025-04-17T14:01:00+09:00</updated><id>https://ferbass.xyz/2025/04/17/inspiration</id><content type="html" xml:base="https://ferbass.xyz/2025/04/17/inspiration.html"><![CDATA[<p>This is not a technical post, but I want to share that here.
I’m again attending RubyKaigi, which is held this year in Matsuyama, Ehime, Japan.
I have been to many conferences, but RubyKaigi is always special. Talking with Matz, committers, and other Rubyists is always a great experience. There are many Rubyists I only meet once a year during RubyKaigi.
Although I haven’t been writing Ruby code professionally for quite a while, I still love the language and the community, which is why I always attend RubyKaigi.
I have been here at RubyKaigi, and it inspires me to write better code and be a better person.
Many people here share the same feeling about the Ruby community and the Ruby language, and many get inspired to make something great after being here.</p>

<p>That is all. I just wanted to share my feelings and how inspiring RubyKaigi is for me and many other Rubyists</p>

<p>One more thing: I would like to share a book by my friend Guilherme Orlandini Heurich, an Anthropologist who has studied the Ruby community for the past few years and has released the book called <a href="https://discovery.ucl.ac.uk/id/eprint/10188850/1/Coderspeak.pdf">CODESPEAK</a>.</p>

<p>Thank you</p>

<p>#rubykaigi #rubykaigi2025 #inspiration</p>]]></content><author><name>Fernando Bass</name></author><category term="ruby" /><category term="inspiration" /><category term="code" /><category term="rubykaigi2025" /><summary type="html"><![CDATA[This is not a technical post, but I want to share that here. I'm again attending RubyKaigi, which is held this year in Matsuyama, Ehime, Japan. I have been to...]]></summary><media:thumbnail xmlns:media="http://search.yahoo.com/mrss/" url="https://ferbass.xyz/img/avatar.png" /><media:content medium="image" url="https://ferbass.xyz/img/avatar.png" xmlns:media="http://search.yahoo.com/mrss/" /></entry><entry><title type="html">Changing GPG Password</title><link href="https://ferbass.xyz/2025/01/21/changing-gpg-passphrase.html" rel="alternate" type="text/html" title="Changing GPG Password" /><published>2025-01-21T13:31:00+09:00</published><updated>2025-01-21T13:31:00+09:00</updated><id>https://ferbass.xyz/2025/01/21/changing-gpg-passphrase</id><content type="html" xml:base="https://ferbass.xyz/2025/01/21/changing-gpg-passphrase.html"><![CDATA[<p>Sometime ago I posted about <a href="/2021/05/05/gpg-key-generate-setting-up-backup-and-restore.html">GPG Key</a> explaining how to generate, setup, backup and restore it.
Now I would like to add something to it, recently I decided to change my key password and now I’m taking notes of the proccess in this post.</p>

<p>First find the key you want to change the password</p>

<div class="language-bash highlighter-rouge"><div class="highlight"><pre class="highlight"><code><span class="nv">$ </span>gpg <span class="nt">--list-keys</span>
</code></pre></div></div>

<p>I particularly like to use <code class="language-plaintext highlighter-rouge">--list-keys</code> with <code class="language-plaintext highlighter-rouge">--keyid-format LONG</code> parameter, to get the long key id, which is easier to work with.</p>

<div class="language-bash highlighter-rouge"><div class="highlight"><pre class="highlight"><code><span class="nv">$ </span>gpg <span class="nt">--list-secret-keys</span> <span class="nt">--keyid-format</span> LONG
<span class="o">[</span>keyboxd]
<span class="nt">---------</span>
sec   rsa4096/87C6D385122B1669 2017-12-04 <span class="o">[</span>SC]
      7D30FFF3FC256153A59AEA698726DF85922B8669
uid                 <span class="o">[</span>ultimate] Fernando Bass <span class="o">(</span>no comments<span class="o">)</span> &lt;xyz@mail.com&gt;
ssb   rsa4096/7A822B866BD5E7D1 2017-12-04 <span class="o">[</span>E]
</code></pre></div></div>

<p>In this case, the key id is <code class="language-plaintext highlighter-rouge">87C6D385122B1669</code>.</p>

<p>Now lets change the password</p>

<div class="language-bash highlighter-rouge"><div class="highlight"><pre class="highlight"><code><span class="nv">$ </span>gpg <span class="nt">--edit-key</span> 87C6D385122B1669
</code></pre></div></div>

<p>This will open the <code class="language-plaintext highlighter-rouge">gpg</code> console, where you can change the password</p>

<div class="language-bash highlighter-rouge"><div class="highlight"><pre class="highlight"><code>gpg&gt; passwd
</code></pre></div></div>

<p>If your key is protected, you will be asked to enter the current password,
after that a prompt asking to type the new password and confirmation will be displayed.</p>

<p>If everything goes well, you should be redirect to the <code class="language-plaintext highlighter-rouge">gpg</code> console, where you can save the changes.</p>

<div class="language-bash highlighter-rouge"><div class="highlight"><pre class="highlight"><code>gpg&gt; save
</code></pre></div></div>

<p>Thats it, after save your changes you can start using your GPG Key with the new password.</p>

<p>Thank you</p>]]></content><author><name>Fernando Bass</name></author><category term="gpg" /><category term="security" /><category term="private keys" /><category term="public keys" /><category term="password" /><summary type="html"><![CDATA[Sometime ago I posted about GPG Key explaining how to generate, setup, backup and restore it. Now I would like to add something to it, recently I decided to...]]></summary><media:thumbnail xmlns:media="http://search.yahoo.com/mrss/" url="https://ferbass.xyz/img/avatar.png" /><media:content medium="image" url="https://ferbass.xyz/img/avatar.png" xmlns:media="http://search.yahoo.com/mrss/" /></entry><entry><title type="html">Frequency</title><link href="https://ferbass.xyz/2024/05/02/frequency.html" rel="alternate" type="text/html" title="Frequency" /><published>2024-05-02T11:29:00+09:00</published><updated>2024-05-02T11:29:00+09:00</updated><id>https://ferbass.xyz/2024/05/02/frequency</id><content type="html" xml:base="https://ferbass.xyz/2024/05/02/frequency.html"><![CDATA[<p>Well a post a little bit different today.
Sorry if the title catch you and you thought I’m going to talk about CPU frequency or anything like that :P, but no,
I’m going to talk about the frequency of my posts here.</p>

<p>Well, I used to blog with more frequency in the past (long time), but life being life, I always end up getting busy with something else and the blog ends up being left behind.
But I’ll try to change that, I’ll try to post more often here, even if it’s just a small post like this one, I’ll try to post something at least once a week, let’s see how it goes.</p>

<p>Thats it, just want to share this with you guys, see you in the next post.</p>]]></content><author><name>Fernando Bass</name></author><summary type="html"><![CDATA[Well a post a little bit different today. Sorry if the title catch you and you thought I'm going to talk about CPU frequency or anything like that :P, but no,...]]></summary><media:thumbnail xmlns:media="http://search.yahoo.com/mrss/" url="https://ferbass.xyz/img/avatar.png" /><media:content medium="image" url="https://ferbass.xyz/img/avatar.png" xmlns:media="http://search.yahoo.com/mrss/" /></entry><entry><title type="html">Preventing package upgrade with Homebrew</title><link href="https://ferbass.xyz/2024/04/16/preventing-package-upgrade-with-homebrew.html" rel="alternate" type="text/html" title="Preventing package upgrade with Homebrew" /><published>2024-04-16T09:05:00+09:00</published><updated>2024-04-16T09:05:00+09:00</updated><id>https://ferbass.xyz/2024/04/16/preventing-package-upgrade-with-homebrew</id><content type="html" xml:base="https://ferbass.xyz/2024/04/16/preventing-package-upgrade-with-homebrew.html"><![CDATA[<p>These days at work a collegue came with a question about Homebrew.
He had a package installed with Homebrew, and he didn’t want it to be upgraded. He asked me how to prevent it from being upgraded.
The answer was quite obvious to me,
well as a package manager Homebrew like anyother package manager should be able to prevent a package from being upgraded if you want to do so,
but at same time I realize I haven’t seem many people doing this on macOS with Homebrew compared to Linux Super Users.</p>

<p>So here is how you can prevent a package from being upgraded with Homebrew.</p>

<p>First you need to know the version you want to keep, you can do this with:</p>

<div class="language-bash highlighter-rouge"><div class="highlight"><pre class="highlight"><code>brew list <span class="nt">--versions</span> &lt;package&gt;
</code></pre></div></div>

<p>The result of this command will show you the stable version for the package and the installed version in your environment.</p>

<p>If the current version is the one you want to keep, you can just pin it with:</p>

<div class="language-bash highlighter-rouge"><div class="highlight"><pre class="highlight"><code>brew pin &lt;package&gt;
</code></pre></div></div>

<p>In some cases you might want to keep a specific version, in this case you can install the version you want with:</p>

<div class="language-bash highlighter-rouge"><div class="highlight"><pre class="highlight"><code>brew <span class="nb">install</span> &lt;package&gt;@&lt;version&gt;
</code></pre></div></div>

<p>And then pin it with:</p>

<div class="language-bash highlighter-rouge"><div class="highlight"><pre class="highlight"><code>brew pin &lt;package&gt;@&lt;version&gt;
</code></pre></div></div>

<p>Now if when you run <code class="language-plaintext highlighter-rouge">brew upgrade</code> the package will not be upgradedm and if you want to unpin it, you can do it with:</p>

<div class="language-bash highlighter-rouge"><div class="highlight"><pre class="highlight"><code>brew unpin &lt;package&gt;
</code></pre></div></div>

<p>or</p>

<div class="language-bash highlighter-rouge"><div class="highlight"><pre class="highlight"><code>brew unpin &lt;package&gt;@&lt;version&gt;
</code></pre></div></div>

<p>If you don’t know or with to verify if you have any package pinned, you can do it with:</p>

<div class="language-bash highlighter-rouge"><div class="highlight"><pre class="highlight"><code>brew list <span class="nt">--pinned</span>
</code></pre></div></div>

<p>This command only list the installed packages you have pinned.</p>

<p>And that’s it, now you know how to prevent a package from being upgraded with Homebrew.</p>

<p>Thank you for reading.</p>]]></content><author><name>Fernando Bass</name></author><summary type="html"><![CDATA[These days at work a collegue came with a question about Homebrew. He had a package installed with Homebrew, and he didn't want it to be upgraded. He asked me...]]></summary><media:thumbnail xmlns:media="http://search.yahoo.com/mrss/" url="https://ferbass.xyz/img/avatar.png" /><media:content medium="image" url="https://ferbass.xyz/img/avatar.png" xmlns:media="http://search.yahoo.com/mrss/" /></entry><entry><title type="html">Change MacOS machine name from command line</title><link href="https://ferbass.xyz/2023/06/19/change-macos-machine-name-from-command-line.html" rel="alternate" type="text/html" title="Change MacOS machine name from command line" /><published>2023-06-19T07:26:00+09:00</published><updated>2023-06-19T07:26:00+09:00</updated><id>https://ferbass.xyz/2023/06/19/change-macos-machine-name-from-command-line</id><content type="html" xml:base="https://ferbass.xyz/2023/06/19/change-macos-machine-name-from-command-line.html"><![CDATA[<p>One of the first things I do when I get a new Mac is to change the machine name.
I hate the default name that Apple gives to the machine, so I always change it.</p>

<p>There are many ways to do that, but for me I like to go to the command line and use the <code class="language-plaintext highlighter-rouge">scutil</code> command.</p>

<div class="language-shell highlighter-rouge"><div class="highlight"><pre class="highlight"><code><span class="nb">sudo </span>scutil <span class="nt">--set</span> ComputerName <span class="s2">"machine-name"</span>
<span class="nb">sudo </span>scutil <span class="nt">--set</span> HostName <span class="s2">"machine-name"</span>
<span class="nb">sudo </span>scutil <span class="nt">--set</span> LocalHostName <span class="s2">"machine-name"</span>
</code></pre></div></div>

<p>after that you chan check the name with the following command:</p>

<div class="language-shell highlighter-rouge"><div class="highlight"><pre class="highlight"><code>scutil <span class="nt">--get</span> ComputerName
</code></pre></div></div>

<p>Note that I setting the <code class="language-plaintext highlighter-rouge">ComputerName</code>, <code class="language-plaintext highlighter-rouge">HostName</code>, and <code class="language-plaintext highlighter-rouge">LocalHostName</code> to the same value.
This is not strictly necessary, but I like to keep things consistent.</p>

<p>This gives:
ComputerName: Visible in Finder and AirDrop.
HostName: Used by SSH and CLI tools as <code class="language-plaintext highlighter-rouge">machine-name</code>.
LocalHostName: Resolves as <code class="language-plaintext highlighter-rouge">machine-name.local</code> via Bonjour/mDNS.</p>

<p>Thats all, be creative when choosing your machine name!</p>

<p>Thank you</p>]]></content><author><name>Fernando Bass</name></author><summary type="html"><![CDATA[One of the first things I do when I get a new Mac is to change the machine name. I hate the default name that Apple gives to the machine, so I always change]]></summary><media:thumbnail xmlns:media="http://search.yahoo.com/mrss/" url="https://ferbass.xyz/img/avatar.png" /><media:content medium="image" url="https://ferbass.xyz/img/avatar.png" xmlns:media="http://search.yahoo.com/mrss/" /></entry><entry><title type="html">macOS disable/enable DarkMode for specific Apps</title><link href="https://ferbass.xyz/2022/10/25/macos-disable-enable-darkmode-for-specific-apps.html" rel="alternate" type="text/html" title="macOS disable/enable DarkMode for specific Apps" /><published>2022-10-25T11:31:00+09:00</published><updated>2022-10-25T11:31:00+09:00</updated><id>https://ferbass.xyz/2022/10/25/macos-disable-enable-darkmode-for-specific-apps</id><content type="html" xml:base="https://ferbass.xyz/2022/10/25/macos-disable-enable-darkmode-for-specific-apps.html"><![CDATA[<p>I’ve been disappointed with macOS for quite some time. I’m still using Mac daily because I still need to deal with iOS and Mac development.
I’ll not go into all problems in this post, but <strong>DarkMode</strong>, for example, <strong>Console App</strong> and <strong>TextEdit</strong>,
every time I need to open a log file using Console or deal with some text file using TextEdit,
It’s a pain, in special TextEdit when the file is RTF (Rich Text Format).</p>

<p><img src="/img/posts/2022-10-25-macos-disable-enable-darkmode-for-specific-apps/textedit-darkmode.png" alt="TextEdit DarkMode" /></p>

<p>Unless the Developer allows you to choose the mode you want to use, there are no settings on macOS that let you change it for specific Apps.
Well, since there is no official solution from Apple to enable/disable DarkMode for specific Apps, there is a small trick we can do to enforce the mode we want to use for specific Apps.
To be able to achieve this goal, we are going to use a terminal command on macOS called <strong>defaults</strong>.</p>

<h3 id="defaults">defaults</h3>

<p>The <strong>defaults</strong> command on macOS is powerful. It allows you to modify some <strong>hidden</strong> user settings on specific Apps or macOS.
If you wish to know more about <strong>defaults</strong> check this guide <a href="https://macos-defaults.com/#🙋-what-s-a-defaults-command">macOS Defaults</a>.</p>

<h3 id="identify-the-bundle-id-of-the-application">Identify the bundle id of the Application</h3>

<p>The first step is to identify the bundle id of the application we want to enforce the mode. To do that, we need to run the following command in the Terminal.</p>

<div class="language-bash highlighter-rouge"><div class="highlight"><pre class="highlight"><code>osascript <span class="nt">-e</span> <span class="s1">'id of app "TextEdit"'</span>
</code></pre></div></div>

<p>After identifying the app, we need to change the key <strong>NSRequiresAquaSystemAppearance</strong> to enforce the mode we want to use, <strong>Yes</strong> for LightMode and <strong>No</strong> for LightMode.</p>

<h3 id="enforce-lightmode">Enforce LightMode</h3>

<div class="language-bash highlighter-rouge"><div class="highlight"><pre class="highlight"><code>defaults write com.apple.TextEdit NSRequiresAquaSystemAppearance <span class="nt">-bool</span> Yes
</code></pre></div></div>

<h3 id="enforce-darkmode">Enforce DarkMode</h3>
<div class="language-bash highlighter-rouge"><div class="highlight"><pre class="highlight"><code>defaults write com.apple.TextEdit NSRequiresAquaSystemAppearance <span class="nt">-bool</span> No
</code></pre></div></div>

<h3 id="use-system-defaults">Use system defaults</h3>

<p>If you want to restore the system default for the App, you need to delete the <strong>NSRequiresAquaSystemAppearance</strong> key with the following command.</p>

<div class="language-bash highlighter-rouge"><div class="highlight"><pre class="highlight"><code>defaults delete com.apple.TextEdit NSRequiresAquaSystemAppearance
</code></pre></div></div>
<h4 id="references">References</h4>

<ul>
  <li><a href="https://macos-defaults.com/#🙋-what-s-a-defaults-command">macOS Defaults</a></li>
  <li><a href="https://support.apple.com/guide/terminal/edit-property-lists-apda49a1bb2-577e-4721-8f25-ffc0836f6997/mac">Edit property lists in Terminal on Mac</a></li>
</ul>

<p>That’s all, and I hope this can be useful for someone else as well.</p>

<p>Thank you</p>]]></content><author><name>Fernando Bass</name></author><category term="macOS" /><category term="DarkMode" /><category term="setup" /><category term="defaults" /><category term="NSRequiresAquaSystemAppearance" /><summary type="html"><![CDATA[I've been disappointed with macOS for quite some time. I'm still using Mac daily because I still need to deal with iOS and Mac development. I'll not go into...]]></summary><media:thumbnail xmlns:media="http://search.yahoo.com/mrss/" url="https://ferbass.xyz/img/avatar.png" /><media:content medium="image" url="https://ferbass.xyz/img/avatar.png" xmlns:media="http://search.yahoo.com/mrss/" /></entry><entry><title type="html">Alacritty, Fish, tmux, moving forward with my dev environment</title><link href="https://ferbass.xyz/2022/10/11/fish-alacritty-tmux-moving-forward-with-my-dev-environment.html" rel="alternate" type="text/html" title="Alacritty, Fish, tmux, moving forward with my dev environment" /><published>2022-10-11T10:00:01+09:00</published><updated>2022-10-11T10:00:01+09:00</updated><id>https://ferbass.xyz/2022/10/11/fish-alacritty-tmux-moving-forward-with-my-dev-environment</id><content type="html" xml:base="https://ferbass.xyz/2022/10/11/fish-alacritty-tmux-moving-forward-with-my-dev-environment.html"><![CDATA[<p>I have been using the combination of ZSH + iTerm2 on my command line environment even before Apple adopted ZSH on macOS Catalina. My first experience with ZSH was utilizing a collection of plugins and configs from <a href="https://ohmyz.sh/">oh-my-zsh</a>. After some time, I decided to change to another group of plugins and configurations called <a href="https://github.com/skwp/dotfiles">YADR</a> (Yet Another Dotfile Repo). I also created <a href="https://github.com/ferbass/yadr.custom">my customization</a> on top of YADR expired by my friend <a href="https://github.com/rpanachi/yadr.custom">Panachi</a>, who also did the same. I had no problem with these combinations, although the YADR project became outdated, and iTerm2 didn’t evolve much in the latest updates, so I decided to change my environment to try and learn something new.</p>

<p>This post is not a tutorial but an experience sharing about changing my dev environment. I strongly encourage you to check the official documents if you want to change your setup and face some issues.</p>

<h2 id="alacritty">Alacritty</h2>

<p>I started searching for a new terminal emulator. I wanted something fast, reliable, and with a nice set of features since I spend a lot of time using the terminal during my day. During my search, one of my colleagues introduced me to <a href="https://alacritty.org">Alacritty</a>, and I thought it was cool. Alacritty is a <a href="https://jwilm.io/blog/announcing-alacritty/">GPU-Accelerated terminal emulator</a> with a nice feature set, and since I was thinking about giving tmux another try, I decided to go with it.</p>

<p>I haven’t yet done much on Alacritty, but I was delighted with the default configuration, and with minimal changes, I could get in almost the way I wanted.
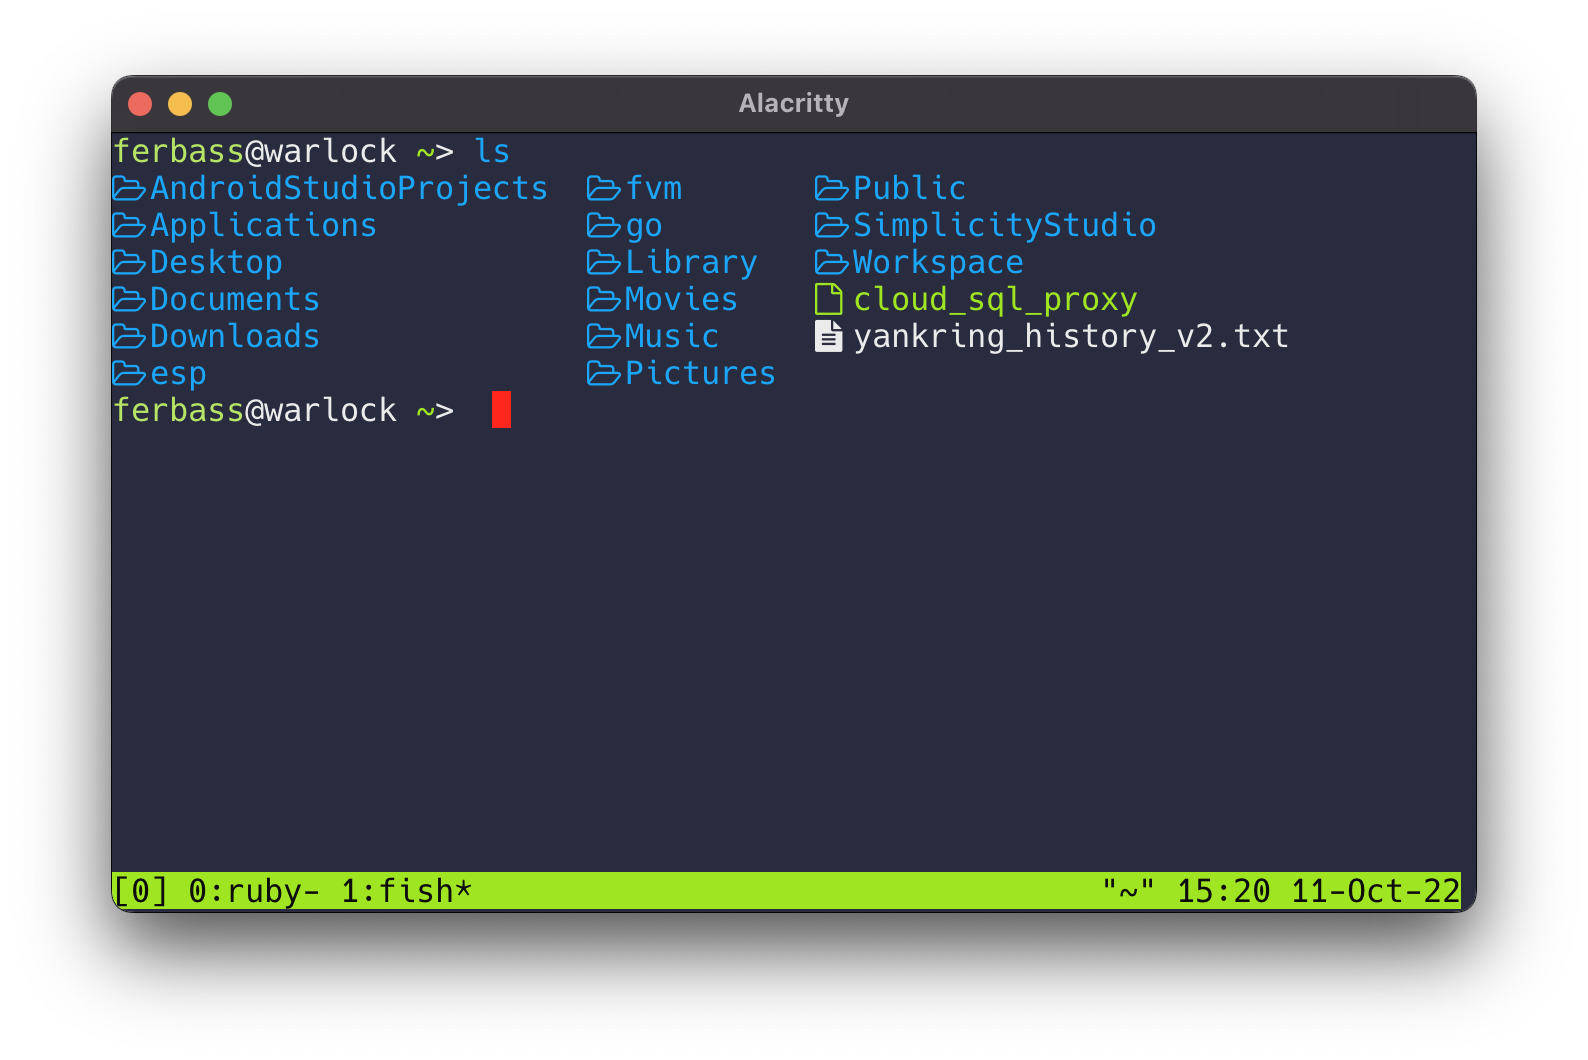
</p>

<p>My basic configuration includes the <a href="https://www.nerdfonts.com">NerdFonts</a>, which I was already using with iTerm2, and a set of Alacritty themes that you can find in this <a href="https://github.com/eendroroy/alacritty-theme">repo</a>, you can see what my <code class="language-plaintext highlighter-rouge">.alacritty</code>.yml` looks like below.</p>

<div class="language-yaml highlighter-rouge"><div class="highlight"><pre class="highlight"><code><span class="c1"># ~/.alacritty.yml</span>
<span class="c1"># Font and style</span>
<span class="na">font</span><span class="pi">:</span>
  <span class="na">normal</span><span class="pi">:</span>
    <span class="na">family</span><span class="pi">:</span> <span class="s">Hack Nerd Font</span>
    <span class="na">style</span><span class="pi">:</span> <span class="s">Regular</span>
  <span class="na">bold</span><span class="pi">:</span>
    <span class="na">family</span><span class="pi">:</span> <span class="s">Hack Nerd Font</span>
    <span class="na">style</span><span class="pi">:</span> <span class="s">Regular</span>
  <span class="na">italic</span><span class="pi">:</span>
    <span class="na">family</span><span class="pi">:</span> <span class="s">Hack Nerd Font</span>
    <span class="na">style</span><span class="pi">:</span> <span class="s">Italic</span>
  <span class="na">bold_italic</span><span class="pi">:</span>
    <span class="na">family</span><span class="pi">:</span> <span class="s">Hack Nerd Font</span>
    <span class="na">style</span><span class="pi">:</span> <span class="s">Bold Italic</span>
  <span class="na">size</span><span class="pi">:</span> <span class="m">16</span>
  <span class="na">offset</span><span class="pi">:</span>
    <span class="na">x</span><span class="pi">:</span> <span class="m">0</span>
    <span class="na">y</span><span class="pi">:</span> <span class="m">0</span>
  <span class="na">glyph_offset</span><span class="pi">:</span>
    <span class="na">x</span><span class="pi">:</span> <span class="m">0</span>
    <span class="na">y</span><span class="pi">:</span> <span class="m">0</span>

<span class="c1"># Theme</span>
<span class="na">import</span><span class="pi">:</span>
  <span class="pi">-</span> <span class="s">~/.alacritty-colorscheme/themes/argonaut.yaml</span>
</code></pre></div></div>

<p>I’m using a theme called <code class="language-plaintext highlighter-rouge">argonaut</code>, that’s what my Alacritty looks like at the moment of this post.</p>

<p><img src="/img/posts/moving-forward-with-my-dev-env/alacritty.png" alt="Alacritty screen shot" /></p>

<h2 id="fish">Fish</h2>

<p>I often see people talking about <a href="https://fishshell.com">Fish shell</a> on Twitter, Reddit, etc. I was curious about Fish shell, but I never looked into them in detail, and now since I have decided to refresh my environment and try something new, and to be honest, I didn’t spend any time looking for another alternative.</p>

<blockquote>
  <p>Why fish?
Fish is a fully-equipped command line shell (like bash or zsh) that is smart and user-friendly. Fish supports powerful features like syntax highlighting, autosuggestions, and tab completions that just work, with nothing to learn or configure.<br />
If you want to make your command line more productive, more useful, and more fun, without learning a bunch of arcane syntax and configuration options, then fish might be just what you’re looking for!
https://fishshell.com/docs/current/tutorial.html</p>
</blockquote>

<p>I’m not going into details about how to install fish and set it as your default shell. Please check the official documentation tutorial to understand all those steps <a href="https://fishshell.com/docs/current/tutorial.html">https://fishshell.com/docs/current/tutorial.html</a>.</p>

<p>So far, I’m enjoying Fish shell. Features like Autosuggestions, Tab Completions, and Syntax Highlighting are handy. But of course, there is a learning curve to start using Fish. For example, create an alias or set an environment variable that uses a different syntax.</p>

<p>The more I use Fish more I discover about its features, and I’m very impressed by the number of features and integrations Fish has.
I’m not going to share my <code class="language-plaintext highlighter-rouge">fish.config</code> file yet on this post, but I plan to share my entire config on my GitHub.</p>

<h2 id="tmux">tmux</h2>

<blockquote>
  <p>tmux is an open-source terminal multiplexer for Unix-like operating systems. It allows multiple terminal sessions to be accessed simultaneously in a single window. It is useful for running more than one command-line program at the same time.<br />Wikipedia https://en.wikipedia.org/wiki/Tmux</p>
</blockquote>

<p>I tried tmux a long time ago; for some reason, my experience was slightly frustrating, but I decided to give tmux another try. Since I’m still getting used to tmux, I did change a few configurations to enable the mouse and <code class="language-plaintext highlighter-rouge">clear</code> command to be able to clean up the screen and scroll back to the top; maybe I will come up with more configurations in the future, but for now, the default key bidding works fine to me.</p>

<p>That’s what my <code class="language-plaintext highlighter-rouge">.tmux.conf</code> looks like now.</p>

<div class="language-bash highlighter-rouge"><div class="highlight"><pre class="highlight"><code><span class="c"># .tmux.conf</span>
<span class="c"># enable mouse integration for "tab" change etc</span>
setw <span class="nt">-g</span> mouse on

<span class="c"># Enable terminal clear scrollback / Ctrl + l </span>
<span class="nb">set</span> <span class="nt">-g</span> default-terminal xterm-256color
</code></pre></div></div>

<p>Here is a <a href="https://tmuxcheatsheet.com">tmux cheat sheet</a> I found with some basic commands like create and navigate between windows, panes,  sessions, etc.</p>]]></content><author><name>Fernando Bass</name></author><category term="Alacritty" /><category term="Fish" /><category term="tmux" /><category term="Environment" /><category term="Shell" /><category term="Command-line" /><category term="dev" /><summary type="html"><![CDATA[I have been using the combination of ZSH + iTerm2 on my command line environment even before Apple adopted ZSH on macOS Catalina. My first experience with ZSH...]]></summary><media:thumbnail xmlns:media="http://search.yahoo.com/mrss/" url="https://ferbass.xyz/img/avatar.png" /><media:content medium="image" url="https://ferbass.xyz/img/avatar.png" xmlns:media="http://search.yahoo.com/mrss/" /></entry></feed>